Search This Blog

Tuesday, November 16, 2010

AutumnFest Crafts 2010 of Kenova, WV


Didn't make much money but had loads of fun. Several of the local Stitch and Bitch ladies of Huntington hung out with me.  

Have you heard of the Pumpkin House of Ceredo?  Here's a few pictures and it is something to see. I believe there were 3000 carved pumpkins lit up. Another Pumpkin House link.  Maybe we'll see ya next year!

Tuesday, August 10, 2010

Oh Hell No

My Vista computer is fried. How dare it. Probably the mother board. Can't fix her right now so I pulled out the old ME and hooked that dinosaur up. Many, many glitches. Yuck. Just started enjoying Ravelry. Now I seem to be in read only mode. No responding to posts, no PMing. Not really interested in finding out what else I cannot do. But we can get online and well, that is something, I guess. Contacted HP and the dear man on the other side of the line says to me, "honestly, ~3 years~ of using a computer, truthfully that is to be expected". Mother board fried after only 3 years? I held my tongue. He did offer me a one time deal of a lap top and a computer all for about 1,000 dollars. Well damn, let me check my back pocket. Husband Darling-Dear believes a year of no central air (yeah, damn thing's also fried) is what did it. Maybe so. Maybe not so. Seem's like there's lot's getting fried at my house. Time to go fishing. Do a fish fry. I guess.

Anyone else going through hell and back? Funny thing, this is nothing compared to what my house was going through the past few years. I should shut my mouth.

On a happier note. Pulled out my fiber goods and started to do a bit of spinning again. I parked my arse right in the living room so my hubby can feel sorry for me and get that wool picker constructed. Just a little ol' box picker. The discussion proceeded this way.

HDD: "Why don't you look for a used picker online. How much do they cost?"
He's talking about one of those Fancy Pickers made by Pat Green. He likes them. I look on Ravelry (pre-fried computer) and see several. $450-500.
Me: "Good price, babe?"
HDD: "Well, where's those plans."
Me: "There's one lady who sells a box picker for $150."
HDD: "Naaa." He's now looking at instrux. I'm a bad girl.

Shoot, I need to get back on Ravelry and look for the gal who makes spindles. She has real nice directions on getting a good friction fit.

Gotta love Ravelry.

Sunday, August 8, 2010

Local Stitch and Bitch

Have been getting out of the house. A little. To the local stitch and bitch. These ladies are a hoot. I enjoy their fresh perspective and wit. And lets not forget the real attraction. Last week one young lady brought her Baynes spinning wheel. Another showed her how to chain ply. Another whipped out her spindle and began to chain ply. I drooled. Also. Knitting projects to die for. Oh yes. One lovely young lady brought her FO  Versatility from Knitty. A very good reason to move my butt off the couch. No dynamite needed.

Things have gotten very quiet around here. Only one grandchild running around screaming instead of 2 or 3. Less grown up kids shouting at each other. Less tension, less mayhem. More peace and quiet, more time. Hope I don't stay bored much longer...

Sunday, August 1, 2010

Been Hanging Out at Ravelry

Been having all kinds'a fun. Guess that's why I've not been posting. I'm sure some of you's understand. Been there yet?

One of the forums I like visiting is the testing pool. Which is a place where a person can pick up a pattern to test for a budding designer or two. It helps to broaden the brain. The talent that's running loose there, it astounds me.

I want some of this talent. I want it. I might be thinking, beneath what lies above, hiding under the upper realm, the actual sneaking side of the mind, that some of this smart shit will rub off one me. Am I deluding myself? I might be, but, why not see. That's my way of thinking. Then again my way of thinking isn't all that talented. Hmmm, a conundrum of sorts.

I do have a my first free Ravelry pattern for your enjoyment. It's the same free knit scarf posted elsewhere on this blog. If you do download and decide to knit one up, tell me what you think. I hope you find it fun to make.

Another faved Ravelry group is the West Virginia Fiber Artists. Especially the Stitch & Bitch forum. A very funny bunch of ladies. Now go join Ravelry.com. You have already? Yip, swat's I'm talkin 'bout, right there.

Saturday, July 17, 2010

Oh Yes! I've been promoted...

...back to high speed. Thank you lord. That was getting to be seriously annoying.

And we're back from visiting our Long Island friends for the 4th of July. They showed us a great time. Took us to the lovely beaches of the south shore and the  Montauk Point Light House. The climb up the light house stairs was real scary and high but I persevered.


lovely beachy pic

view from the beach

It was so hot. Oh my g.d. But I loved smelling the ocean air and hearing the sea gulls and the tide. It's been ages and ages ago since I've been near a beach.

My LI friends are lucky but then again there's the taxes....

Tuesday, June 29, 2010

Damn, I've Been Demoted...

...to dial up. Though its just a been week, What A Trip.

I have never been a person who has much patience anyway. I can see this is gonna be a real trial.

waiting...and waiting...and waiting. Damn...

And so the next thing I'd like to learn/figure out is how to put up a video. Or for starters how to do a vid with my camera. Anyone for seeing some backwards knit and purl?

Wednesday, June 16, 2010

Free Knit Pattern

Recently joined Ravelry and lordy lordy there sure is some talent there.

Have tested a pattern or two for some amazing designers. It's always a pleasure to help out. Course I like how this makes me a better knitter. If you hang with those who do stuff better than you it helps sharpen your brain. Or not. I wanna be smart. Har...

If I actually ever sell patterns I'll probably be great for beginners. Har Har...

My way of creating is to discover a stitch and run it into the ground working it into as many different things as I can. And I do not like gauge. Yar Mate...

                     Skinny Summer Scarf: Free Knit Pattern

                                                                    sorry about the date. i swear i'll fix it. someday

Stitch: An even multiple of 3 plus 1.
Yarn: One 100 gram hank of Cascade Ultra Pima color #3742. A lovely shade of light green.
Tools: Straight knitting needles size 4; crochet hook size F or G; scrap yarn for provisional cast on.
Talents: Able to jump tall buildings in a single bound. No. Just a bit of crochet.

You will cast on 25 sts by way of a crocheted chain and use the bumps located on the bottom of chain. Go ahead and make the chain 27 or 28 with the scrap yarn. Turn chain over and with the Ultra Pima and a knitting needle, pick up the 25 sts. 8x3=24+1=25. Even multi of 3 plus 1.

Begin: *k3, p3* repeating across ending with the last stitch as k1.

Now repeat this row (over and over and over) until you have a small ball of yarn left, about 6 grams. Don't cast off. This left over yarn will be for the crocheted off edging. Though I actually forgot how much yarn I saved for the trim. But it really doesn't take much.

I am bad for not writing down the instrux as I go. Shame on me.

Now the Edging: You have not cast off and sts are still on needle. Grab the crochet hook in your right hand (course if you're a south paw...) and knitting needle in the left (...you'd probably do the opposite) and prepare to crochet the sts off the needle. Simply slip first 3 sts onto hook, yo and pull through these 3sts, chain 8; *slip next 3 sts to hook, yo, pull thru the 3 sts, chain 8*; repeat this until you have 4 sts left. Just (catch 2 sts, yo, pull thru and ch 8) twice. One end complete.

Working Opposite End: Carefully remove the crochet chain, one st at a time, picking up each st with the knitting needle. 25 sts. Repeat as for other edging.

Weave in ends. You're done.

Wednesday, June 9, 2010

Inspired to knit.

A friend checked out my blog and said she found it humorous. Though she also mentioned that she didn't exactly feel inspired to knit while reading through the posts. This gave me pause. Am I trying to inspire? As I considered this, I realized that my reason for blogging about knitting, crochet and all things fiber related, was that it was I who needed inspiration. Life, at times, can be harsh. Crafting something from nothing can bring such happiness. 

Actually I never was much of an artist, or a poet. Knitting was a gift I found lying at the bottom of my heart. To tell true, a woman, who me and my friend miss very much, was my first teacher in the fiber arts. It was she who inspired me to knit. She planted this gift inside me and I found it again. I am very grateful to her.

Thank You Nan

Tuesday, June 8, 2010

Free Crochet Pattern: Cute Flowers

My Ravelry Badge is fixed!!!...thanks to the awesome helpful folks at Ravel's non-ravelry techno help group.
Please excuse the stupid date on above picture.
These cute little flowers are fun and fast and I love making 'em. They weigh about 2 or 3 ozs. Which tells you want a maniac I must be. That's a small sized ball of left over yarn to have laying around. Especially when there are a lot of them. =0D

The Pattern:
They are simple enough. Make a chain with either the loop method, or by chaining 5 sts and joining to form a ring or by chaining 3 and making your sc's into 3 ch from hook.
Oh yeah, choose your hook to match your yarn. A no sweat situation.
I prefer to ch 5 and join. I can get 12 or 14 sc's into the middle ring which I think makes a better flower.
I think the pink and brown one is done with sc'ing into the 3 ch from hook method.
And it looks like I didn't write the instrux down for these cuties but never fear they are easy. It is basically a lot of chaining.
After filling up the ring with sc's slide the sts over a bit and squeeze in some more sc's. You want a least 12 -16 sc's. Some of my flowers have 18. Join your round by slip stitching into the back strand of first sc. Ch 10 and again sl st into back strand.
What you'll then do is chain 10 and sl st into front strand of same sc; chain 10 and sl st into the back strand of next sc, ch 10 and sl st into front strand of same sc. 
* Ch 10, sl st to back strand of next st, ch 10, sl st to front strand of same st*. 
And repeat * to * in each sc around. Slip stitch into last front strand of last sc. Ch 8.

Now look at your work. 
Do you see beneath the petals how each sc has a vertical bar that is isolated from making the petals?
 Sl st around this bar right below the last petal.
*Ch 8, sl st to same bar; sl st to next bar*, and repeat * to *.
Fold those petals out your way.
You could really do all this any way you like. It's just fun to do. I'm no designer!

And what's so nice about a long print yarn is that you don't gotta do any color change.
Or you can change the color for the bottom petals if so inclined.

 
a lovely topper for a lovely lady


a close up of the flower
all the one color
you can see I did not know about jogless joining
Yes, that's the featured pattern and it's been felted. I did use a bigger hook to make the stitches a bit looser. The leaves are also crochet. I think what I did was make a chain to desired leaf length. Working in one strand of each chain you'd put stitches that are a bit taller in height, first thin, then wider and then thinner again, mimicking the shape of a leave. Sc, extended sc, dc, extended dc, (then maybe a treble that depending on how many sts you got) extended dc, dc, extended sc, sc; then work the same sequence on the other side of chain. This seems like about 9 or 10 sts. Then again I think I may have done 2 trebles and a few slip sts on the end. 12 sts maybe? But really, just experiment and have fun!

Hope these instrux are ok.
Enjoy!

Monday, June 7, 2010

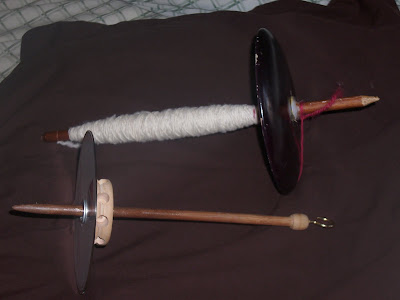
hand made spindles

they are rough looking but work okay

The one on top is made from an old dowel, about the same size in diameter as an 11 needle, a wooded lamp base piece and some glue. It seems that Elmer's School Glue Gel works better than Titebond wood glue. Whats up with that?


The bottom spindle is made up of my other lost, but now found, size 11 knitting needle, a tinker round and a CD, plus a washer for some weight. The CD and washer resisted being glued but setting over night helped hold them together.


skein 2 is my newest twist adventure
should I or should I not dye

I think skein 2 came out a bit better though my camera is giving me the heebee jeebies.
I cannot get rid of that damn date on Q mode.
Me and my camera are not getting along.
What the devil did I do different from pic 1 to pic 2?
strange
Sorry about the picture fuzziness.

Sunday, June 6, 2010

Free Knit Felted Beanie Pattern

One thing I love to fool with is simple machine wash felting. This pattern is not an exact science. And for me that's the fun part. Just winging it.

my first fedora
This came out a bit small, reason being, it wasn't watched properly while felting. Made with Lion Brand Landscapes which felted very fast. This color seems to be discontinued.

these were also made with a yarn by Lion Brand but I forgot what it's called...
Not seeing it on their web site. Probably discontinued. This yarn did not want to felt.

these...

...and this were made free form
After making a few felted hats I decided to wing it and use up some wool I had laying around.

My version
I start by casting on 4 or 5 sts and joining to work in the round. Knit one round, place a clip-on marker and slip on each rnd.
Next rnd:  increase in each st.
Knit one round.
Next rnd:  k1, inc nxt st and repeat.
Knit one rnd.
Next rnd:  k2, inc nxt st and repeat.
Knit one rnd.

To make a long story short, on every other round continue in this way: next increase rnd, inc into 4th st (k3, inc nxt st); next inc rnd, inc into 5th st (k4, inc nxt st); next inc rnd, inc into 6th st (k5, inc nxt st) and so on, until you have about 10 or 11 inches across entire crown. Believe me, you might need this much for the felting.
Now simply continue knitting even (no increases) until the sides of your beanie reaches your chin. That should about do it. The blue beanie with the fold at the brim was the first one that I free formed. I had knit well beyond my chin and this was the result. Which turned out OK.
3 above are actually striped various different ways.


you can barely see the different hues in the one on the right
I like how those colors almost blended together

I made a cute hat that also came out kinda small, pink and green stripes with a pink flower and green leaves, all felted, which I gave to my tiny sister-in-law. She is 4' 9". Something like that. Little tinky head. There is always someone who can use what we make. Will put up a picture soon, hopefully with her wearing it.

Hope you can use this pattern for your left over wool yarn. If the felting is watched carefully and you keep trying it on for size your beanie should turn out a-OK.
I should note that wool does felt at different speeds. I kinda like how this can come out though I make it a point not to mix a single ply, roving type wool with any regular spun type wool. Other than that I say go for it. I have worked with different thickness and again I kinda like how that comes out. My free form beanies are all made with mystery wool yarn. Not sure if your yarn is wool? Burn an end and give a whiff. It should smell like burned hair. And the fire will probably go out on it's own. Acrylic will melt pretty fast. Watch out! 
Enjoy.

Friday, June 4, 2010

Have I any wool? Yes sir...

2 bags full
This one I am currently working with. Pretty soft and very fine.


I think I'll save this for my PVC spinning wheel. Wonder how the color will come out when spun and made into yarn? The brown is real pretty but the white is a little stark in comparison. Will be interesting to see.

I wanted to show some projects that use up all those small leftover balls of yarn. Those which I annoyingly just cannot throw away.


granny square cap
3 long print yarns were used here. Easy coloration, fun to make.


head bands...
These are versions of the headband pattern posted elsewhere on my blog. The top two are the dc post stitch/s and the bottom two are in the extended sc stitch also posted elsewhere. The blue and green used peaches and creme's double WW cotton . Deft Blue and Apple Green. The others are also in their cotton.


handbands...


and more handbands...


plus one more for a little tike
This one and the dark blue above were finished with slip st at the edges instead of reverse sc on my other headbands. This was done at each front post dc st skipping the back post sts.


a close up of the post stitch

Tuesday, June 1, 2010

BLOGGER!!!!

why are some my pictures offset?

My PVC Spinning Wheel

do you see the glow?
My hubby made it for me yesterday. Ain't he a sweetie? We used DragonsKeep's instructions. A dead link Its a bit smaller than donisfuff's stuff  but we needed to modify the instrux a bit. The most important change was the 5" lengths of pvc pipe, which are the cross bars on the bottom, and they turned out to be too long. Doni had these at 4" and that seems to be a better size. 5 inches makes the base too wide for that long bike wheel bolt thingy. That would mean the wheel sitting on air.

Hubby thought putting crossbars at this point (a change in pattern ) might be a good idea. I concurred. Of course we had not thought to check the bolt length before doing any of this. It turned out not to be a big problem. He just squeezed a bit as he went to the next level. But anyway that brought the T joint count from 12 to 16. We also cut about 4" from the top level because of adding those extra T joints. Course this was after the fact. You could instead take the extra 4" from the bottom level and make both levels look more balanced. Or something.
And with lots of little kiddies running around at our house I wanted something to stabilize the wheel. That piece of wood in the background of above picture got the vote.

the double dagger
 
Seriously though, I had a size 11 knitting needle for the spindle but could not, for the life of me, figure out which side I would be working on. I am a bit ambidextrous. Add in the fact of never sitting before a spinning wheel, and well, the confusion sets in. Husband Dear then says, "Let me grind both sides of this metal rod for you."

I'm like, "Uhhhhmm. Okay...."

this works as the break
 
a piece of pipe and two rubber bands
the little gremlins just wanna have fun...with my wheel.
Can't have that...

Saturday, May 29, 2010

Ravelry Button

Uhhh, how the hell do you do it! I put the button into my picasa album and tried to write the HTML URL yak yak in like blogger instrx say to do buuuut not working. Freakin' Frackin' Double Dratt. Will come back to it later. Maybe someone with know-how-isms can explain. Letter by letter by dot and dash. Wowza.

Thursday, May 27, 2010

my cute hand crafted spindle

Here is a picture my tinker toy spindle. I think the small rocks lend a rustic feel.
these are the items I used to make it
These knitting needles were bought from Walmart. Useless for knitting because they kept catching the yarn even after sanding them a bit. They just never worked too good. The needle shown is a size 10 1/2. I used a size 11 for my spindle which needed glued but a 13 would actually be a nice snug fit. You can see how much chunkier the red tinker part is to the size 10 1/2. I'd have put the other 11 in the picture but it seems to be missing. And if you saw my work room you'd know why.

this is the little darling that started it all. a gift from a nice local fiber artist. her blog

these are my first, ever, wee, plyed, hand spun hanks
The one on the right, with the unintended VM included, was made first using the gifted spindle. I used a small wire doggie comb that looked like a dinky carder. Not very good at removing unwanteds.
The hank on the left looks a little better. The spindle I made was a bit on the light side at first so added the small stones to increase the weight. It seemed to help. That time I used bigger doggie combs on the wool and they actually removed almost all of the sticks and stones... 

As to the plying. That was frustrating (...wanna break some bones?). One lady used two med sized terracotta flower pots turned upside down with the yarn balls inside. You'd pull the ends through the holes and ply that way. A super idea but, alas, no funds for such. I think I may have found something that will work. It's one of those lazy susan wooden spice rack. like this Mine I picked up at a flee market. 3 bucks maybe? I already removed the lazy susan part for a (some day) home made yarn swift. Lots of free instrux on the web for that. So many smart inventors out there in cyber space. I send out a big thank ya! Anyway, I think if I lay the thing on its side, stick the balls inside the 4 slats and pull the ends through two of the holes I should be able to ply that way. I am currently combing and spinning some more wool and shall continue on.

Hope some one can use my spindle idea.
Have a good day.

Wednesday, May 26, 2010

times they are a changin'

fast! Yeah every time I turn around there is something new is going on. Here at my house. The list:

Not working. I have to stay at home because my grandson will soon be out of early head start. And I have custody.

Two of my sons (who used to babysit so I could work) they now have work pending. They are wielders. A real hit and miss kind of thing. They are on the last rung at the bottom of the ladder. You know the score. BUT there is work to be had. That is a good thing.

Scored some fleece. Two actually. And so a new adventure begins. Which I am loving. These fleeces were a freebie. What up with that? Yes God I Will Follow You Down Any Fiber Path. Course I do not have a clue as to what anything should look like. One fleece was very dirty. 4 hot water washes this creature took. 3 bottles of blue dish detergent. I bought 2 thin wire dog brushes and 2 steel dog combs. Guess you know what those are for. As I sit combing out this fuzzy fiber my husband actually had the nerve to say, "that looks like something a crazy, evil person would do." Well babe you better start getting used to it. Oh yeah.

The fleece was given to me when I volunteered at a local fair. click next until you see the sheep's wool! Pretty grimy. You can see my pile to the left. I am standing behind the camera. Just the way I like. But the Heritage Farm Museum shows how our early settlers lived. A neat place do a vacation at.

Have been looking for equipment for spinning. On The Cheap. I made a spindle with a short wood knitting needle, size 11, a round wood tinker toy connector with small rocks glued into it's holes around the edge and a cup hook screwed on top. Spun and plied one wee hank. Not to bad. When my rechargables are ready, will put up pictures of my stuff. My goodies.
Want a wool picker and a some wool combs. Want a spinning wheel. For as close to free as I can get. I'm thinking Make It Yourself. Which is not free but close enough, really.

Here are 2 different links for a PVC pipe wheel. Dragons Keep's wheel  This'un's free.

Doni Stuff's stuff  This one's for purchase. 7 bucks.

The other two items on my list? Got blessed. A gent sent me two of his wood working plans. For combs and a box picker. Free. What's wrong with him?! He asked me to put a close pin on my lips about this. His web site is still being worked on and will soon begin sales for his Fiber Woodworking Plan Creations. They are priced very reasonable. But for those of you with folding money right now here is Kaydessa's safe box woolpicker . Some wool pickers look like something that dude from the movie "Pit and the Pendulum" might use to torture you. Slowly. Painfully. I would say you could not use these things around kids. But the one in the above link looks very safe.

And so some changes are very good. Some are on the okay side. Some are a real bummer. Like making no money. That sucks!

Okay, have a good one.

Tuesday, April 27, 2010

How to mend a broken heart.

Well, maybe that is a bit over the top but I am a little sad. Here's the deal. I flubbed my awesome job with StitchDiva Studios. Yes. You heard right. I had to stop being a stunt stitcher. Because of time and it's limits thereof. Went back to work + family needs = one of Jennifer's projects being made incorrectly. I decided if I did not have enough time to do her work properly then I should not be wasting her time. I knew it was time to step down. And as I read her gentle and kindly note I thought the floor was moving from under my feet and that I was about to be swallowed whole into the fiery pits of h.e. double l. I might venture to say that the previous sentence is also a bit overblown. Though I was mortally freaked out. It was a sweet dream snuffed out by the harsh realities of life. Bummer. And so, hence, my sorrow. And shame. Yes that also. I will add, as each day passes, I feel less unnerved by this episode this sinking feeling in the pit of my stomach this walking into a telephone pole in public (of course in public, won't find one in private) this...oh gosh, there I go again. I hate being a drama queen. Sorry about that. Got a little carried away. But for real, through it all, I am glad I put myself out there. It shows that I may have a small tad, a tiny tink, of talent in the knitterly process. Its in the proper finishing of projects that I glaringly fell short. And that I have too much going on for the professional life. Those of you who have it all have my undying sympathy ooo I meant undying admiration! But seriously, to the pros, shock and awe. I stand amazed.

I now find myself thinking about when knitting reintroduced itself to me a few short years ago. I remember how it helped me through a very difficult time. Why did that journey, that obsession, begin? It was the process, my fascination of, and with, the ambidextrous nature of knitting. My knitting quest. It might seem crazy to many but it feels like I've come home.

Tuesday, April 20, 2010

A Free Quasi Pattern in Crochet

Little Chemo Cap  


This beanie was made for a young lady, the age of 5, attending our local Head Start Program. She has been taking chemo therapy and her hair is falling out. If you can believe that such a thing could happen! A child for gosh sakes. One afternoon the Early HS teachers asked if I could make something in pink for this child. I had it ready the next morning. It's the same stitch I used for the cozy I posted the other day. Please feel free to use this pattern for a cause that is close to your heart.

A worsted weight yarn and matching crochet hook. I had some pink and white ww acrylic laying dormat and was glad to be able to make good use of it. (you may have thought the same; stash buster!)

I made a chain to go around my grandson's head with a little bit of ease making the count an even number. Mine was 60 sts and about 18 " around. (I love to bottom up a crochet beanie).

Begin: To join this chain without twisting, fold chain in half with bumps out and take the hook out of the last loop. You then pull that last loop through the first bump with the hook. Your yarn should be behind the work toward your right (or left if a southpaw!) with the loop coming forward through the bump. Chain 2 and immediately turn. You'll work back the way you just came, instead of going on forward. For some reason continuing onwards causes a twist.

The Stitch: After the ch 2 make an *extended sc (ex-sc), ch1, extended sc (ex-sc) all in the next bump, then skip next bump* and repeat this * to * around the chain. You can see an explanation of the stitch ex-sc and the one I thought up from it (ex-sc, ch1, ex-sc) in one of the posts below. I then slip stitch around the beginning chain 2.

Continue: Ch 2. In each ch-1 space around work an ex-sc, ch1, ex-sc; sl st around beginning ch-2. Repeat this round until tall enough to begin decreasing. I make these beanies up, on the fly, and so forgot how many inches but I think it's 4 or 4 1/2" in height. To figure for your decreases, take a count of how many stitch motifs you have and decide on your divisibles. My beanie had 30 motifs and 5 x6 =30. I broke my decreases into 5 sections. 

Begin decrease: Ch 2. *(In next ch-1 space work ex-sc, ch1, ex-sc) 5 times; in next ch-1 space work 1 ex-sc only*; repeat * to * around; sl st into space before last ex-sc, sl st around beginning ch-2.
(25 motifs; 5 single ex-sc's)

Next Round: Ch 2. Work ex-sc, ch1, ex-sc in each ch-1 space around, skipping over the single ex-sc's all together; sl st around beg ch-2. (25 motifs)

Next Round: Ch 2. *(In next ch-1 space work ex-sc, ch1, ex-sc) 4 times; in next ch-1 space work 1 ex-sc only*; repeat * to * around; sl st into space before last ex-sc, sl st around beg ch-2. (20 motifs; 5 single ex-sc's)

Next Round: Ch2. Work ex-sc, ch1, ex-sc in each ch-1 space around, skipping over the single ex-sc all together; sl st aournd ch-2. (20 motifs) 

Next Round: Ch2. *(In next ch-1 space work ex-sc, ch1, ex-sc) 3 times; in next ch-1 space work 1 ex-sc only*; repeat * to * around; sl st into space before last ex-sc, sl st around beg ch-2. (15 motifs; 5 single ex-sc's)

Next Round: Ch2. *In next ch-1 space work ex-sc, ch1, ex-sc; yo, pull up a loop from next ch-1 space, yo, pull up a lp from next space before the ex-sc (3 loops on hook), yo and draw through 2 loops, yo, draw thru last 2 lps, ch1*, repeat from * to * around. (5 motifs; 5 dec and ch1's)

Next Round: Ch2. Work an ex-sc in each ch-1 space and at each dec around, sl st around ch-2. (10 ex-sc) 

Next Round: Ch 2. *Pull up a loop from next 2 ex-sc's, yo, pull through 2 lps on hook, yo pull thru last 2 loops, 1 lp on hook*; repeat this from * to * around, sl st around ch-2. (5 decrease sts)

If the hole on top of beanie is not small enough for ya work a sl st in each st around and that should do it. Fasten off and weave in ends.

Please let me know if this was understandable! Drop by with a picture of what you made and have a good day.


Sunday, April 11, 2010

knitting saves the day!

Took a vaca to New River Gorge. Me, my sis and Gorge-ous, the young man above. No. I do not white water raft nor would I ever. ever. bungy jump. We just meandered the route around the river and came to the falls pictured behind "The Dude". This spot, near the head of the New River, is called Sandstone Falls.

Another view of Sandstone Falls

A view of Sandstone Falls at Overlook across the river from on Rt 20
I've lived in West Virginny for a many years but this is a first time visit for me. I loved it. 

This is Grist Mill north of Sandstone. Way cooler in the flesh. Yes, it was raining.

This past week we camped near by but it was soooo cold in the mountains. So we had to cut camping short. Bummer! Still the trip was great and will remain a fav.
And how did Knitting Save the Day? Here's the deal. We pull into camp, pull tent from bag, pull poles (those crazy bungy rope/cord thingys) from their bag and boom, that new fangled bungy concept snaps! Uh oh....no tent poles, no tent!!
Sis says, "Heeey, I am freaking out!"
Course we could have gone to a motel but I thought, well, how about maybe we fix it.
"How the devil are we gonna do that? Look. Look where the sun is!" she says.
Yes, it was close to doing the sunset thing but I say, "let me get my tapestry needle!"
"What are we gonna do, sew it up?" She didn't say it but I know she wanted to. I saw the look. But she was freaking out hence the smart remark ready to leap from her lips. Bungy jump and dance a jig. Course she is very independent. A real tough cookie. Takes no shite from no one. Sick of being bossed around. All that kinda thing. But here we are in a pickle, so to speak, and being strong sometimes is not enough. Imagination may just save the day. I run for it (my needle) and my gold wool (a favorite color), tie yarn to cord, attach needle to yarn, drop needle into pole section and tamp it down. Well damn, it works! Dear nerve racked sister snatches the needle and begins to work. Must of been 15 of those babes needing need'ling. I did not think to take a picture of this intersting concept and, anyhow, the sister may not have stood for it.

I must add that I Always Take Along some kind of yarn craft. Many of my family members find this Very Annoying. But now I feel pretty justifited. Knitting does save the day. Guess knitting can have its uses.

Note: pictures were taked by sis. Thanks for taking me along for this adventure DC!

Tuesday, April 6, 2010

Free crochet pattern: Headband

Today is 5/5/2010.   Picture is now up so you can see!

I'm gonna put up these directions without a picture. I want to get it on paper while it's in my head but I promise to include a pic soon.

Any left over yarn and matching hook. I like this done up in cotton for summer. Wool, of course, is nice for cooler weather. This pattern is great for using up yarn. And all the young people around me love how it comes out.

Pattern St:
         Front Post dc (fp dc): with a loop on hook, yo, insert hook around next stitch from front to back and to front, yo, pull up loop, (yo, pull through 2 loops on hook) twice. One loop left on hook. Front Post dc made.
         Back Post dc (bp dc): with loop on hook, yo, insert hook around next stitch from back to front and to back, yo, pull up loop, (yo, pull through 2 loops on hook) twice. One loop left on hook. Back Post dc made.
         These moves are made around the post of the dc instead of working the chain on top of each stitch.


Begin:
       Make a chain to go around your noggin' plus 3 or 4 more, making for an even count. Not tight. Fold the chain in half with the bumps outward. Take hook from last chain and pull loop through first bump, chain 2 loosely and immediately turn. You will work back the way you just came and not forward, as in the usual manner when working in the round. This helps to prevent a twist in your chain. My head usually requires from about 78 to 90 chains depending on the yarn.
      In next bump and in every bump around, work a Double Crochet (dc); slip stitch (sl st) around the beginning chain 2 (ch2).

Next Row: Ch2 loosely, *fp dc in next dc, bp dc in next dc*, repeat this around, sl st around beg ch2.
Next Row: Repeat this row for about 8 or 10 rows or less. Whatever you might like. Or whatever your yarn will yield. A wool headband is nice, wider, for warmth. The one shown above has 5 rows in cotton. I like to finish with a row of reverse sc.
For the edge: after last sl st of last row, ch1, sc in each dc, sl st to beg ch1, reverse sc in each in every other sc around going the other way (also called crab st). Sl st to beg reverse sc. Fasten off, and weave in end.
Attach yarn with a slip knot to any dc on opposite edge. Ch1, sc in same spot, and in each dc around, sl st to beg ch1. Work reverse sc in each in every other sc around, sl st to beg ch1. Fasten off, and weave in end.

This stitch makes the headband kinda chunky. Hope pattern's easy enough to understand! Enjoy and drop me a note on what you think of your headband.

Note:  I put the strikethroughs because I made this headband last night and realized there's not supposed to be a round of single crochet and also because the reverse sc is done in every other stitch instead of each stitch. This makes the headband both snug and stretchy. The one shown is made in Universal's "Cotton Batik Supreme" in the color Farmers Market. I like this color. I had already knit up a beanie in it and had enough left over for the headband. Hope you's like it!

Have a good day.

Saturday, March 20, 2010

Free Pattern: Crochet

It's something I sorta made up but not kinda thing. In Donna Kooler's "Encyclopedia of Crochet" there's this neat stitch called "Extended Single Crochet" (ext-sc) and it goes a little something like this....

Insert hook into next chain (or stitch), yo and draw up a loop (2 loops on hook). yo and draw through only one of the loops on hook (still 2 loops on hook), yo and draw through both of the two loops on hook. It's like an all-in-one single crochet, chain one. Very Kool. And so worked this up and decided to share.

Cell Phone Cozy or any other sort of gadget holder.

A simple custom fit pattern.


Any yarn and hook size to match. Mine used about 9 ozs/24 grams of Universal Yarn's Cotton Supreme Batik in Watermelon Patch, left over from a matching beanie (picture up soon). Such a yummy color. Can anyone say summer! I used a G hook. I think this stitch looks better a bit on the tight side.

A tapestry needle.

A cute button. Or you can make one yourself as shown above.

The Stitch:
Set up round or row: *in next ch, ext-sc, chain 1, ext-sc, skip next ch*. Repeat this sequence from * to* to end.
Continuing the pattern: *in next ch-1 space, ext-sc, ch1, ext-sc.* This is repeated in each ch-1 space of round or row.

Begin by making a chain the width of bottom of item to cozy and add 3 sts making for an odd number. I started with chain 15 for my cozy which, by the way, fits my camera pretty good. But not any phones laying around the house.

You will be working both sides of the chain. In 3rd ch from hook make an *ext-sc, ch1, ext-sc in next single strand of ch, skip next strand of ch*, repeat * to * to end of side.

You will now turn your work around and work the loops on the other side of the chain beginning right next to the slip knot. You may need to wiggle the hook a little to open up the chain at this spot. Make your ext-sc, ch1, ext-sc in this spot, skip next ch, *ext-sc, ch1, ext-sc in next ch, skip next ch*, repeat * to * making a ext-sc, ch1, ext-sc in strand of last chain.

This gave me 14 motifs total from my chain 15, 7 for each side. They are basicly across each other, two for each chain. Looks kinda flat, don't it? The sides will begin to stand up after a round or two. We'll go round and round instead of slip stitching to the beginning of the rounds.

Next Rnd: Ext-sc, ch1, ext-sc in next ch-1 spot between the extended single crochets on the other side, (hey, it's starting to stand up!) *ext-sc, ch1, ext-sc in next ch-1 spot, repeat this to end of side*. Repeat this sequence from * to .* Another words, round and round until you have the height you need for your cozy. Sides and bottom are all one piece. I worked for 4 1/2" and it's width was 3 1/2".

Finish working to one side then make a chain of 36, or just big enough to get around a persons hand. Fold chain in half with bumps outside, remove hook, place hook into last ch-1 space just made and draw the last loop of chain through this space, ch1 (joining into a strap), turn right back around to last chain and slip st into each bump all around the chain right back down to first bump and dock into this same ch-1 space proceeding on to ext-sc, ch1, ext sc-in each of the next ch-1 spaces as if nothing else is going on, to end of side.

At this point I worked back and forth to make the flap to close cozy, decreasing by making only 1 ext-sc in last ch-1 space at each side.

Mine went like this: after making wrist strap; 6 ext-sc, ch1, ext-sc in each of next 6 ch-1 spaces, 1 ext-sc only in last ch-1 space, turn;
5 ext-sc, ch1, ext-sc in next 5 ch-1 spaces, 1 ext-sc only in last ch-1 space, turn;
4 ext-sc, ch1, ext-sc in next 4 ch-1 spaces, 1 ext-sc only in last ch-1 space, turn;
3 ext-sc, ch1, ext-sc in next 3 ch-1 spaces, 1 ext-ch only in last ch-1 space, turn;
2 ext-sc, ch-1, ext-sc in next, 2 ch-1 spaces, 1 ext-sc in last ch-1 space, turn;
1 ext-sc, ch1, ext-sc in next ch-1 space, 1 ext-sc in last ch-1 space, turn.

At this point I made a loop: chain 6, slip st to other end of flap tip and slip st into each bump of the chain and then sl st back into flap to finish. I used one size bigger hook to accomplish this because my chains are a bit tight. Fasten off and weave ends.

Button: I had a bit of yarn left and so... ch3, 10 sc in 2nd ch from hook, 10 sc in each sc around, sc 2tog around and go around again with sc 2tog, slip st to last st and draw yarn through leaving a long tail. This of course is done in the round. Attach tapestry needle and sew this button down.
Hope this is understandable and if so, hope you enjoy making it. Let me know!

As you can see I don't have Donna Kooler's Encyclo of Crochet. That's her Knit Book! LOL