...to dial up. Though its just a been week, What A Trip.
I have never been a person who has much patience anyway. I can see this is gonna be a real trial.
waiting...and waiting...and waiting. Damn...
And so the next thing I'd like to learn/figure out is how to put up a video. Or for starters how to do a vid with my camera. Anyone for seeing some backwards knit and purl?
Tuesday, June 29, 2010
Wednesday, June 16, 2010
Free Knit Pattern
Recently joined Ravelry and lordy lordy there sure is some talent there.
Have tested a pattern or two for some amazing designers. It's always a pleasure to help out. Course I like how this makes me a better knitter. If you hang with those who do stuff better than you it helps sharpen your brain. Or not. I wanna be smart. Har...
If I actually ever sell patterns I'll probably be great for beginners. Har Har...
My way of creating is to discover a stitch and run it into the ground working it into as many different things as I can. And I do not like gauge. Yar Mate...
Skinny Summer Scarf: Free Knit Pattern

sorry about the date. i swear i'll fix it. someday
Stitch: An even multiple of 3 plus 1.
Yarn: One 100 gram hank of Cascade Ultra Pima color #3742. A lovely shade of light green.
Tools: Straight knitting needles size 4; crochet hook size F or G; scrap yarn for provisional cast on.
Talents: Able to jump tall buildings in a single bound. No. Just a bit of crochet.
You will cast on 25 sts by way of a crocheted chain and use the bumps located on the bottom of chain. Go ahead and make the chain 27 or 28 with the scrap yarn. Turn chain over and with the Ultra Pima and a knitting needle, pick up the 25 sts. 8x3=24+1=25. Even multi of 3 plus 1.
Begin: *k3, p3* repeating across ending with the last stitch as k1.
Now repeat this row (over and over and over) until you have a small ball of yarn left, about 6 grams. Don't cast off. This left over yarn will be for the crocheted off edging. Though I actually forgot how much yarn I saved for the trim. But it really doesn't take much.
I am bad for not writing down the instrux as I go. Shame on me.
Now the Edging: You have not cast off and sts are still on needle. Grab the crochet hook in your right hand (course if you're a south paw...) and knitting needle in the left (...you'd probably do the opposite) and prepare to crochet the sts off the needle. Simply slip first 3 sts onto hook, yo and pull through these 3sts, chain 8; *slip next 3 sts to hook, yo, pull thru the 3 sts, chain 8*; repeat this until you have 4 sts left. Just (catch 2 sts, yo, pull thru and ch 8) twice. One end complete.
Working Opposite End: Carefully remove the crochet chain, one st at a time, picking up each st with the knitting needle. 25 sts. Repeat as for other edging.
Weave in ends. You're done.

Wednesday, June 9, 2010
Inspired to knit.
A friend checked out my blog and said she found it humorous. Though she also mentioned that she didn't exactly feel inspired to knit while reading through the posts. This gave me pause. Am I trying to inspire? As I considered this, I realized that my reason for blogging about knitting, crochet and all things fiber related, was that it was I who needed inspiration. Life, at times, can be harsh. Crafting something from nothing can bring such happiness.
Actually I never was much of an artist, or a poet. Knitting was a gift I found lying at the bottom of my heart. To tell true, a woman, who me and my friend miss very much, was my first teacher in the fiber arts. It was she who inspired me to knit. She planted this gift inside me and I found it again. I am very grateful to her.
Thank You Nan
Tuesday, June 8, 2010
Free Crochet Pattern: Cute Flowers
My Ravelry Badge is fixed!!!...thanks to the awesome helpful folks at Ravel's non-ravelry techno help group.


Please excuse the stupid date on above picture.
These cute little flowers are fun and fast and I love making 'em. They weigh about 2 or 3 ozs. Which tells you want a maniac I must be. That's a small sized ball of left over yarn to have laying around. Especially when there are a lot of them. =0D
The Pattern:
They are simple enough. Make a chain with either the loop method, or by chaining 5 sts and joining to form a ring or by chaining 3 and making your sc's into 3 ch from hook.
Oh yeah, choose your hook to match your yarn. A no sweat situation.
I prefer to ch 5 and join. I can get 12 or 14 sc's into the middle ring which I think makes a better flower.
I think the pink and brown one is done with sc'ing into the 3 ch from hook method.
And it looks like I didn't write the instrux down for these cuties but never fear they are easy. It is basically a lot of chaining.
After filling up the ring with sc's slide the sts over a bit and squeeze in some more sc's. You want a least 12 -16 sc's. Some of my flowers have 18. Join your round by slip stitching into the back strand of first sc. Ch 10 and again sl st into back strand.
What you'll then do is chain 10 and sl st into front strand of same sc; chain 10 and sl st into the back strand of next sc, ch 10 and sl st into front strand of same sc.
* Ch 10, sl st to back strand of next st, ch 10, sl st to front strand of same st*.
And repeat * to * in each sc around. Slip stitch into last front strand of last sc. Ch 8.
Now look at your work.
Do you see beneath the petals how each sc has a vertical bar that is isolated from making the petals?
Sl st around this bar right below the last petal.
*Ch 8, sl st to same bar; sl st to next bar*, and repeat * to *.
Fold those petals out your way.
You could really do all this any way you like. It's just fun to do. I'm no designer!
And what's so nice about a long print yarn is that you don't gotta do any color change.
Or you can change the color for the bottom petals if so inclined.

a lovely topper for a lovely lady

a close up of the flower
all the one color
you can see I did not know about jogless joining
Yes, that's the featured pattern and it's been felted. I did use a bigger hook to make the stitches a bit looser. The leaves are also crochet. I think what I did was make a chain to desired leaf length. Working in one strand of each chain you'd put stitches that are a bit taller in height, first thin, then wider and then thinner again, mimicking the shape of a leave. Sc, extended sc, dc, extended dc, (then maybe a treble that depending on how many sts you got) extended dc, dc, extended sc, sc; then work the same sequence on the other side of chain. This seems like about 9 or 10 sts. Then again I think I may have done 2 trebles and a few slip sts on the end. 12 sts maybe? But really, just experiment and have fun!
Hope these instrux are ok.
Enjoy!
Monday, June 7, 2010
hand made spindles
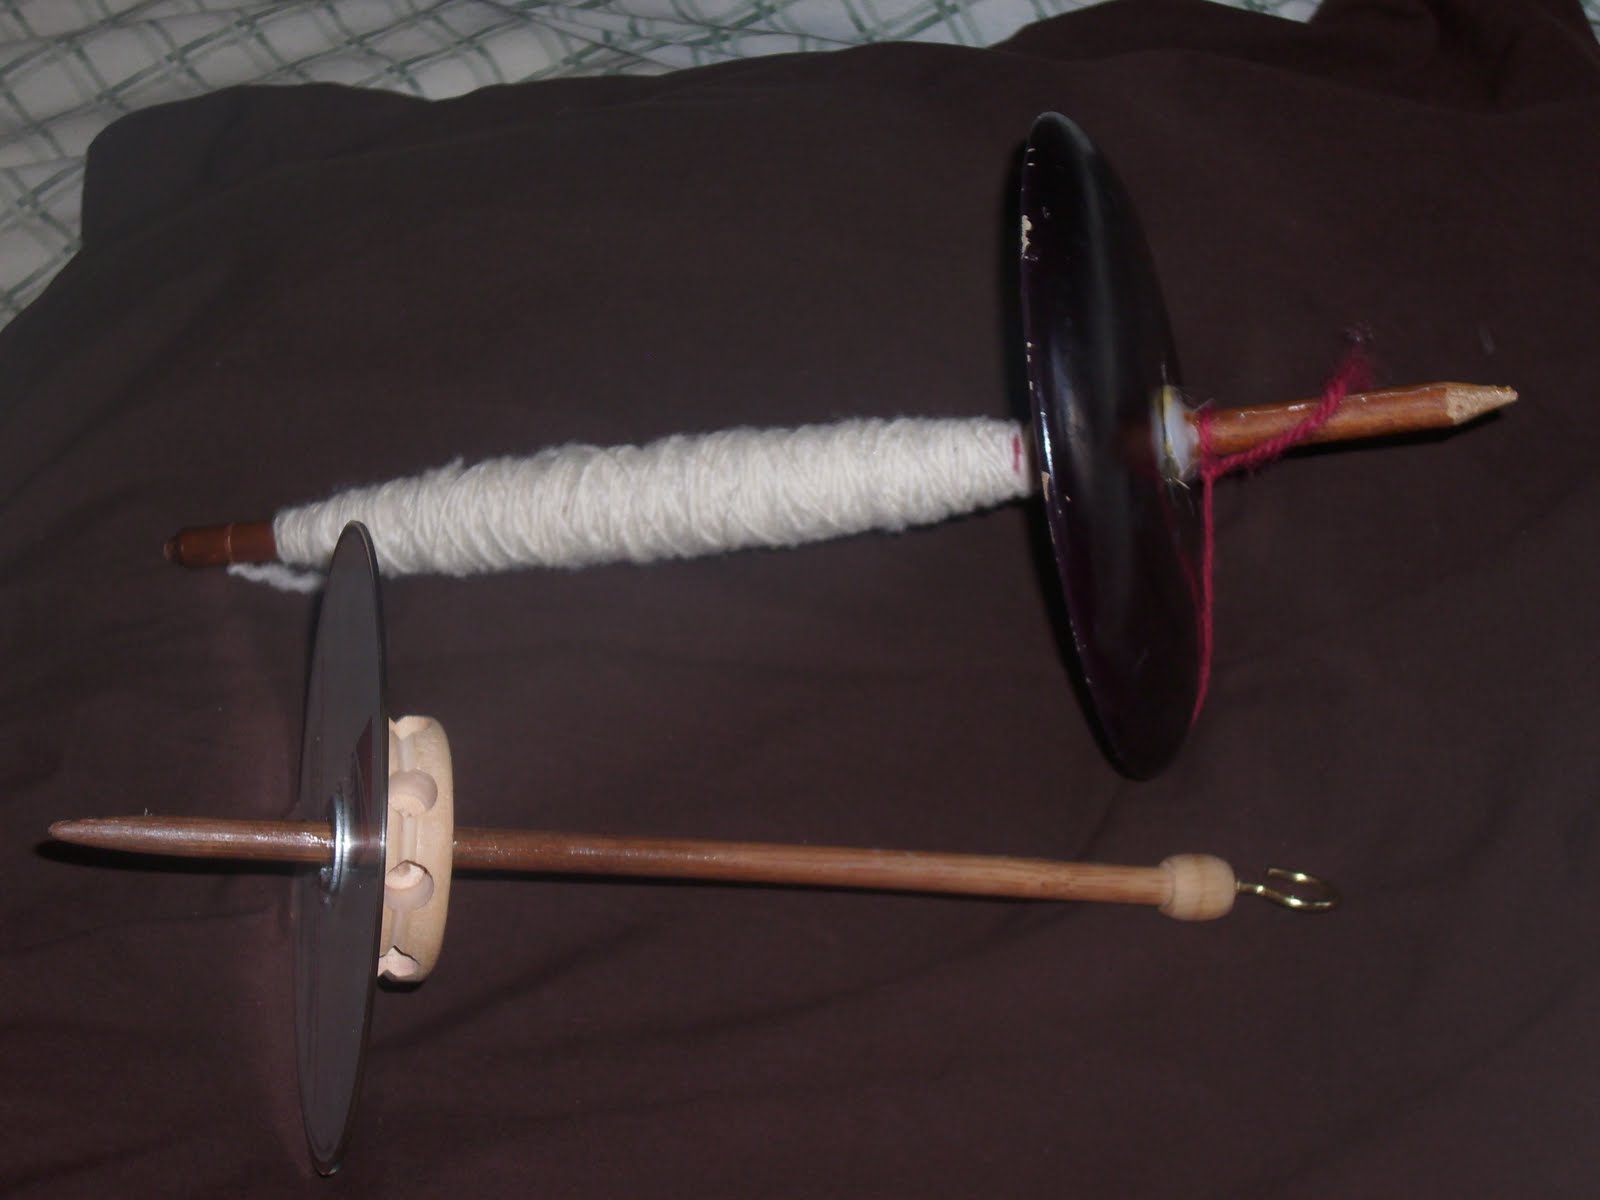
they are rough looking but work okay
The one on top is made from an old dowel, about the same size in diameter as an 11 needle, a wooded lamp base piece and some glue. It seems that Elmer's School Glue Gel works better than Titebond wood glue. Whats up with that?
The bottom spindle is made up of my other lost, but now found, size 11 knitting needle, a tinker round and a CD, plus a washer for some weight. The CD and washer resisted being glued but setting over night helped hold them together.

skein 2 is my newest twist adventure
should I or should I not dye
I think skein 2 came out a bit better though my camera is giving me the heebee jeebies.
I cannot get rid of that damn date on Q mode.
Me and my camera are not getting along.
What the devil did I do different from pic 1 to pic 2?
strange
Sorry about the picture fuzziness.
Sunday, June 6, 2010
Free Knit Felted Beanie Pattern
One thing I love to fool with is simple machine wash felting. This pattern is not an exact science. And for me that's the fun part. Just winging it.

my first fedora
This came out a bit small, reason being, it wasn't watched properly while felting. Made with Lion Brand Landscapes which felted very fast. This color seems to be discontinued.

these were also made with a yarn by Lion Brand but I forgot what it's called...
Not seeing it on their web site. Probably discontinued. This yarn did not want to felt.

these...

...and this were made free form
After making a few felted hats I decided to wing it and use up some wool I had laying around.
My version
I start by casting on 4 or 5 sts and joining to work in the round. Knit one round, place a clip-on marker and slip on each rnd.
Next rnd: increase in each st.
Knit one round.
Next rnd: k1, inc nxt st and repeat.
Knit one rnd.
Next rnd: k2, inc nxt st and repeat.
Knit one rnd.
To make a long story short, on every other round continue in this way: next increase rnd, inc into 4th st (k3, inc nxt st); next inc rnd, inc into 5th st (k4, inc nxt st); next inc rnd, inc into 6th st (k5, inc nxt st) and so on, until you have about 10 or 11 inches across entire crown. Believe me, you might need this much for the felting.
Now simply continue knitting even (no increases) until the sides of your beanie reaches your chin. That should about do it. The blue beanie with the fold at the brim was the first one that I free formed. I had knit well beyond my chin and this was the result. Which turned out OK.
3 above are actually striped various different ways.
you can barely see the different hues in the one on the right
I like how those colors almost blended together
I made a cute hat that also came out kinda small, pink and green stripes with a pink flower and green leaves, all felted, which I gave to my tiny sister-in-law. She is 4' 9". Something like that. Little tinky head. There is always someone who can use what we make. Will put up a picture soon, hopefully with her wearing it.
Hope you can use this pattern for your left over wool yarn. If the felting is watched carefully and you keep trying it on for size your beanie should turn out a-OK.
I should note that wool does felt at different speeds. I kinda like how this can come out though I make it a point not to mix a single ply, roving type wool with any regular spun type wool. Other than that I say go for it. I have worked with different thickness and again I kinda like how that comes out. My free form beanies are all made with mystery wool yarn. Not sure if your yarn is wool? Burn an end and give a whiff. It should smell like burned hair. And the fire will probably go out on it's own. Acrylic will melt pretty fast. Watch out!
Enjoy.
Friday, June 4, 2010
Have I any wool? Yes sir...

2 bags full
This one I am currently working with. Pretty soft and very fine.

I think I'll save this for my PVC spinning wheel. Wonder how the color will come out when spun and made into yarn? The brown is real pretty but the white is a little stark in comparison. Will be interesting to see.
I wanted to show some projects that use up all those small leftover balls of yarn. Those which I annoyingly just cannot throw away.

granny square cap
3 long print yarns were used here. Easy coloration, fun to make.

head bands...
These are versions of the headband pattern posted elsewhere on my blog. The top two are the dc post stitch/s and the bottom two are in the extended sc stitch also posted elsewhere. The blue and green used peaches and creme's double WW cotton . Deft Blue and Apple Green. The others are also in their cotton.

handbands...

and more handbands...

plus one more for a little tike
This one and the dark blue above were finished with slip st at the edges instead of reverse sc on my other headbands. This was done at each front post dc st skipping the back post sts.

a close up of the post stitch
Tuesday, June 1, 2010
My PVC Spinning Wheel

do you see the glow?
My hubby made it for me yesterday. Ain't he a sweetie? We used DragonsKeep's instructions. A dead link Its a bit smaller than donisfuff's stuff but we needed to modify the instrux a bit. The most important change was the 5" lengths of pvc pipe, which are the cross bars on the bottom, and they turned out to be too long. Doni had these at 4" and that seems to be a better size. 5 inches makes the base too wide for that long bike wheel bolt thingy. That would mean the wheel sitting on air.

Hubby thought putting crossbars at this point (a change in pattern ) might be a good idea. I concurred. Of course we had not thought to check the bolt length before doing any of this. It turned out not to be a big problem. He just squeezed a bit as he went to the next level. But anyway that brought the T joint count from 12 to 16. We also cut about 4" from the top level because of adding those extra T joints. Course this was after the fact. You could instead take the extra 4" from the bottom level and make both levels look more balanced. Or something.
And with lots of little kiddies running around at our house I wanted something to stabilize the wheel. That piece of wood in the background of above picture got the vote.

the double dagger
Seriously though, I had a size 11 knitting needle for the spindle but could not, for the life of me, figure out which side I would be working on. I am a bit ambidextrous. Add in the fact of never sitting before a spinning wheel, and well, the confusion sets in. Husband Dear then says, "Let me grind both sides of this metal rod for you."
I'm like, "Uhhhhmm. Okay...."

this works as the break
a piece of pipe and two rubber bands
the little gremlins just wanna have fun...with my wheel.
Can't have that...
Subscribe to:
Posts (Atom)